TL;DR
Moving your rig into a closet or other room can drastically reduce noise. Proper placement, ventilation, and basic acoustic treatment make a big difference—often more than foam panels alone. The most effective approach combines distance, strategic placement, and ventilation for a quieter, better-sounding setup.
If you think a closet is just a tiny box, think again. It’s a perfect secret weapon for making your audio setup quieter and better sounding—if you know how to treat it right. The trick isn’t just slapping foam on the walls; it’s about understanding how sound behaves in tight spaces, and how to position your gear for the best results.
This guide will show you why placement, ventilation, and targeted treatment matter more than ever in small rooms. Whether you want a quiet workspace or a decent voice booth, mastering these basics makes all the difference.
Acoustic dampening
& the rig in the closet.
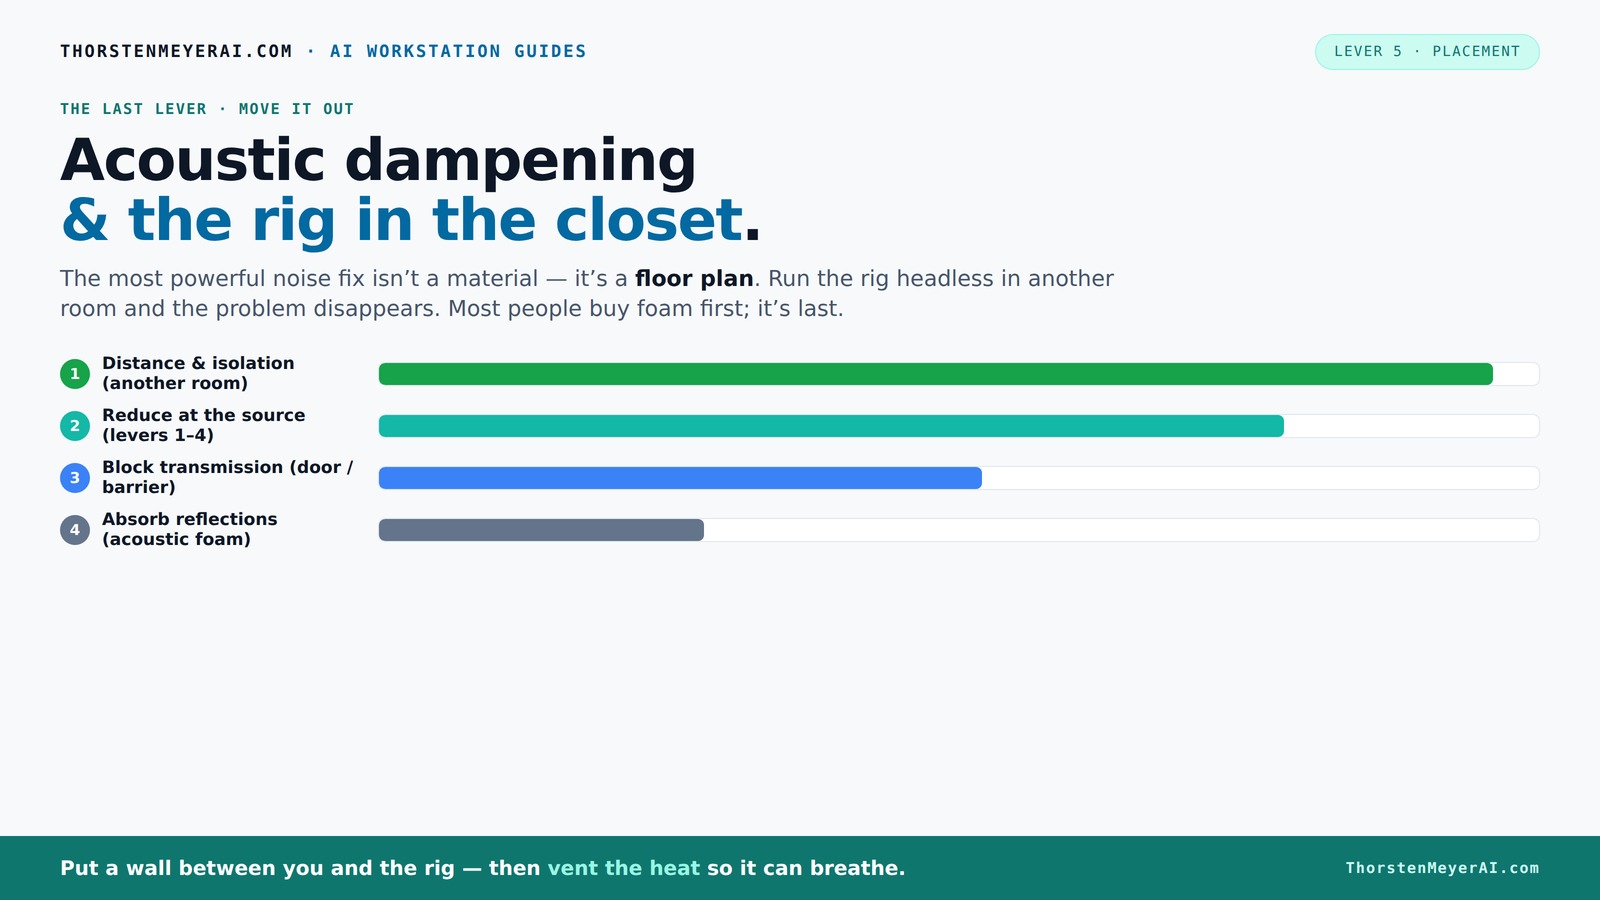
The most powerful noise fix isn’t a material — it’s a floor plan. A rig you can’t hear because it’s in another room beats any amount of foam. Tap the approaches in Part 1 to see what actually works.
(another room)
(levers 1–4)
(door / barrier)
(acoustic foam)
Contain the noise, not the heat
Key Takeaways
- Moving your rig into another room or closet reduces noise more than any foam or paneling.
- Proper ventilation is critical in closet setups—hot air must escape to prevent overheating and noise spikes.
- Treat reflection points like the wall behind the mic and the ceiling to dramatically improve internal sound quality.
- Acoustic foam reduces echo but doesn’t block sound transmission; sealing gaps and adding mass are needed for true isolation.
- In small spaces, coverage and thickness matter—aim for 2–4 inch panels and treat 20–30% of the surface area for best results.

20 Pack Acoustic Panels with Self Adhesive, 12" X 12" X 0.4" High Density Sound Proof Foam Panels for Walls, Soundproof Wall Panels, Brick Sound Absorbing Panels for Home Studio Office Decor - Gray
🔇 Effective Noise Reduction: Design for tranquility, our wall soundproof foam panels are engineered with an exceptional NRC...
As an affiliate, we earn on qualifying purchases.
As an affiliate, we earn on qualifying purchases.
Why Moving Your Rig Is the #1 Way to Silence It
The simplest, most effective way to cut noise is to put your machine somewhere else. A rig in another room—like a basement or closet—can be completely silent from your perspective. You can learn more about acoustic dampening and placement to optimize your setup. You talk to it over the network, so it doesn’t need to be nearby.
Imagine running a high-power GPU in a closet on the other side of your house. You can still access it via SSH or remote desktop, but the noise stays far away. This approach often solves 90% of the problem without any extra treatment.
Of course, it requires good network wiring or Wi-Fi, and proper ventilation. But if noise is your main concern, this move is your best first step.

Focusound 52 Pack Acoustic Foam Panels 1" x 12" x 12" Sound Proof Foam Panles Soundproofing Noise Cancelling Wedge Panels for Home Office Recoding Studio with 300PCS Double-Side Adhesive
Soundproofing - Acoustic foam panels triangular grooves structure for better noise absorption, helps to reduce and absorb unwanted...
As an affiliate, we earn on qualifying purchases.
As an affiliate, we earn on qualifying purchases.
The 'Rig in the Closet' Setup — What Works and What Doesn’t
Placing a noisy machine in a closet can work wonders for noise reduction. But there’s a catch: heat. A sealed closet traps heat, and a 600W GPU can turn the space into a sauna within hours. The temperature rises, fans spin faster, and noise levels spike.
To make it work, you need active airflow—small vents, exhaust fans, or ducting. Many DIYers use a simple setup: a passive vent plus a quiet exhaust fan, which pulls hot air out and keeps the closet cool. For more tips, see acoustic treatment in closet setups.
For serious noise and heat control, consider a purpose-built soundproof cabinet with temperature sensors, fans, and insulation. These units cost more but keep your rig cool without sacrificing silence. Read more about reducing heat and noise in high-power AI workstations.

Sound Addicted Subble 1.8'' (4 Pack) Silicone Feet Isolation for Amplifiers, Decks or Any Other Audio Equipment, Non-Skid Hemisphere with Adhesive (Sustain up to 45lb) | Subble
Enhance the Sound of Your Stereo Equipment: These silicone isolation feet have an extra-high durometer shore hardness of...
As an affiliate, we earn on qualifying purchases.
As an affiliate, we earn on qualifying purchases.
Placement and Reflection Control: Where to Treat a Closet for Better Sound
In a tiny closet, the main goal isn’t just blocking sound—it’s controlling how sound bounces around. When sound reflects off hard surfaces, it creates echoes that can make recordings or voice communications sound unnatural, harsh, or muddy. These reflections can also cause your microphone to pick up unwanted reverb, reducing clarity.
Understanding where these reflections originate is crucial. Reflection points are often the surfaces directly opposite or adjacent to the sound source or mic. You can find helpful guidance on acoustic placement and reflection control. If not managed, these reflections can reinforce certain frequencies, creating a boxy or boomy sound. Strategic placement of absorptive materials at these points prevents sound waves from bouncing back into the mic or into the room, significantly improving clarity.
Start with your microphone placement—position it close to the sound source and away from reflective surfaces. Then, identify the reflection points—such as the wall behind the mic, the ceiling, or nearby hard surfaces—and treat them with absorption. Covering about 20–30% of these critical points with 2-inch panels can reduce echo and improve internal sound quality. For low-frequency issues, bass traps in the corners can absorb standing waves and prevent bass buildup that causes muddiness. This approach not only enhances sound clarity but also makes your recordings more natural and professional-sounding.
Deep understanding of these reflection points allows you to make smarter treatment decisions. For more detailed advice, visit acoustic treatment strategies. For example, over-treating a single wall can cause an imbalance, making the room sound dull or overly dead. The goal is to target the main reflection zones without completely muffling the space, maintaining a natural sound while reducing problematic echoes. This nuanced approach ensures your recordings are clear and balanced, avoiding the trap of over-absorbing and creating a sterile environment.

KOVIET 8" Room to Room Ventilation Fan with Remote, Quiet Reversible Through the Wall Air Transfer Fan, 10-Speed Smart Exhaust Vent, Temperature Control, ETL Certified for Bedroom, Kitchen, Laundry
Air Transfer for Balanced Comfort: The 8-inch vent fan transfers cool or warm air through walls to balance...
As an affiliate, we earn on qualifying purchases.
As an affiliate, we earn on qualifying purchases.
The Real Difference: Absorption vs. Soundproofing
Many assume foam panels will block sound from escaping or entering, but that’s not true. To learn more about soundproofing techniques, see soundproofing vs. absorption. Acoustic dampening mainly improves internal sound quality, reducing echo and reverb. It doesn’t stop sound transmission.
To actually block noise leakage, you need physical barriers—sealing gaps, adding mass, or decoupling the space from surrounding structures. Think of foam as softening the room’s echo, not stopping sound from sneaking out.
For example, sealing the door gaps with weatherstripping can block 80% of sound leaks, while foam on the walls only improves how the room sounds internally. Combining absorption with physical barriers is the most effective way to both improve sound clarity and reduce noise leakage. Recognizing this distinction helps you allocate resources wisely—prioritizing sealing gaps and adding mass where needed, then using foam for internal acoustics.
How Thick Should Your Panels Be? Covering Your Bases
In a small closet, 2-inch acoustic panels are usually enough for mid and high frequencies. But if you want to tame low-end rumble, go for 4-inch panels or bass traps. Thicker panels absorb more bass, especially in tiny rooms, which often suffer from exaggerated low frequencies due to room modes.
Covering roughly 20–30% of the surface area with foam or panels makes a big difference—less echo, clearer recordings. For comprehensive control, especially in very small spaces, adding bass traps in the corners helps absorb standing waves and low-frequency buildup that can muddy your sound. The key is to achieve a balanced treatment—using thicker panels or bass traps where low-frequency issues are most prominent while keeping mid and high frequencies well controlled with standard panels. This strategic layering prevents the room from becoming overly dead or boomy, preserving a natural sound profile.
Imagine a closet with a couple of 2-inch foam panels on the walls plus bass traps in the upper corners. That combo can dramatically improve internal sound quality without turning the closet into a soundproof chamber. It’s about smart coverage and thickness tailored to your specific acoustic needs, understanding that different frequencies require different treatment depths for optimal results.
Treat the Whole Room, Not Just One Spot
Great sound inside a closet isn’t just about one panel or foam piece. It’s about treating the entire reflection area—walls, ceiling, even the desk surface. The more surfaces you absorb, the less echo and boxiness you get. Ignoring certain areas can leave reflections that muddy your recordings or cause harshness.
For example, adding a blanket over the desk surface and foam on the ceiling can significantly reduce early reflections. Sealing gaps in the door and around vents also helps contain internal reflections, preventing sound from bouncing in and out unnecessarily. Covering all these surfaces ensures a more controlled acoustic environment, which translates into clearer, more natural recordings and voice clarity. Remember, in small spaces, every hard surface acts like a mirror, bouncing sound and creating a boxy or boomy sound. Covering these with soft, absorptive materials makes a noticeable difference in sound quality.
It’s important to think holistically about room treatment—focusing on all reflection points rather than just isolated panels. This comprehensive approach minimizes unwanted acoustic artifacts and allows your equipment to perform at its best, whether for recording, streaming, or simply reducing noise from the rig. Properly treating the entire space ensures a balanced, natural sound that is much more satisfying than piecemeal solutions.
Final Tips for a Quiet, Effective Closet Setup
Combine these strategies for best results: move your rig away, treat reflection points, seal gaps, and ventilate properly. Don’t forget mic placement—closer mics with proper treatment sound much better.
Use soft materials like blankets, acoustic panels, or foam strategically. Position your microphone at the right spot, and treat the nearby surfaces. If you want to go further, install bass traps and consider a DIY soundproof enclosure for the ultimate combo.
Want more technical detail? Check out [how to reduce heat and noise in your AI workstation](https://thorstenmeyerai.com/reduce-heat-noise-ai-workstation/) or explore [low-noise PC cases](https://thorstenmeyerai.com/low-noise-pc-cases-airflow/) for specialized solutions.
Frequently Asked Questions
Can a closet really work as a vocal booth or recording space?
Yes. Many home studios use closets for voice recordings because they naturally reduce reflections. The key is treating reflection points and sealing gaps for internal sound quality, not complete soundproofing.What is the difference between acoustic dampening and soundproofing?
Dampening improves how a room sounds by reducing echo and reflections. Soundproofing blocks sound from leaving or entering. You need both for a professional setup, but they require different solutions.Where should I place acoustic foam or panels in a closet?
Focus on reflection points—behind the mic, ceiling, and nearby hard surfaces. Cover about 20–30% of the area with 2-inch panels. Bass traps in corners help control low frequencies.Do I need bass traps in a small closet?
If you notice low-end rumble or standing waves, yes. Small closets can develop bass buildup, and corner traps help smooth out the sound.How should I ventilate a closet to keep it cool?
Use passive vents and quiet exhaust fans to pull hot air out. For more serious setups, consider a ducted, temperature-controlled soundproof cabinet or custom airflow system.Conclusion
Your closet can be a surprisingly good solution for quiet, high-quality audio—if you treat it smartly. The key isn’t just stuffing foam everywhere; it’s about understanding how sound behaves and making strategic choices. With good placement, ventilation, and targeted absorption, you can turn a tiny closet into a professional-sounding booth that’s quiet and clear.
Remember, the best noise solution is often moving the rig itself. Use the space wisely—your ears (and your neighbors) will thank you.